Five Cheap Photography Accessories—Take Your Photography to the Next Level
- The SLR Lounge iPhone Photo Shoot
- Creating Professional Photography with $30 Reflectors
- Pro Photographer, Cheap Camera Challenge by DigitalRev TV
- Framed Show – Chad Keyes – Smart Phone Photography
Everyone knows that professional photography gear is not cheap. Sometimes, as a beginner or a hobbyist photographer, you don’t always have the budget to afford all those expensive gear. However, there are some cheap camera gear that can help you to take your photography into the next level. Here, I have put together a list of five inexpensive photography accessories that every photographer should own to be able to make better pictures.
-
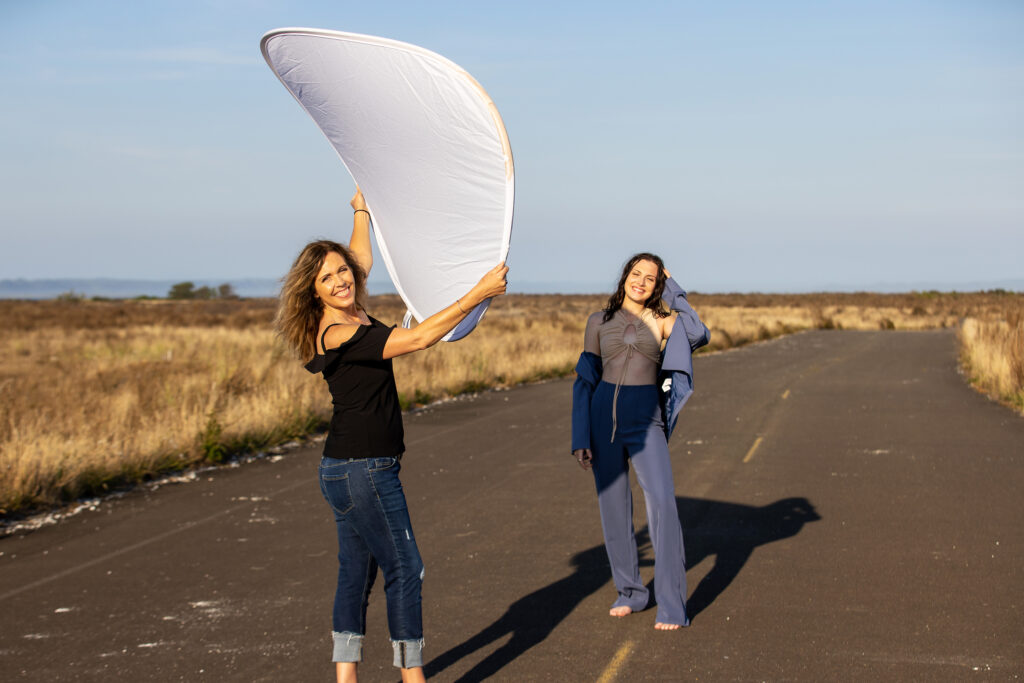
Reflectors
Reflectors are the most useful photography accessory that I could think of. That is because if you have a reflector in handy, you can shoot great images just by using natural light.

-
Usages/Advantages:
- As a fill light: use reflectors to bounce sun light or light from your flash back in to your subject to fill in shadows.
- To create catch lights: Eyes are the most important element of a portrait. Reflectors can be used to create catch lights in eyes, which helps to give a life to your portraits.
- Very inexpensive: you can buy a reflector for $10+ on eBay or Amazon. Alternatively, you can even use cheap foam core boards or any other white material as reflectors.
- To defuse light: harsh sunlight is too contrasty for outdoor portraits or macro photography. You can use reflectors to block direct sunlight falling on to your subject. That will reduce contrast of the light and allow you to make great images.

This is a one light portrait. Notice the difference when I used a reflector to bounce light back into my subject’s shadow side of the face. ©2014 Chathura Jayasinghe Photography. -
Flash diffusers
If you own a flash, next thing you need to consider buying is a flash diffuser. Direct flash creates too much contrast light on your subject, hence, creates unpleasing and harsh shadows. By using a diffuser on your flash, you can create better images compared to direct flash. The general rule of thumb for getting softer light is “larger the light source in relation to your subject’s size, softer the light you get.” So, flash diffusers may not create the best light in the world, however, it’s better than direct flash.
-
Cable release
If you like to shoot landscape, architecture, long exposure, or night photos, cable release is a must-have accessory in your camera gear kit. Especially, when you shoot with slower shutter speeds, a tiny camera movement can result you in softer images. Even if you shoot on a tripod, the pressure you apply on the shutter button to capture images can cause some camera movements. With a cable release you can keep your hands completely away from the camera and still control shutter button to take images.
One alternative for this is to use the self-timer on your camera. One problem with this is that, say you want to capture motion blur of a moving subject for a dramatic effect, self timer would not allow you to press the shutter on the exact moment that you want.
You can buy a cable release as cheap as $5 or as expensive as $150. The difference is you pay some money for the brand name and the expensive ones come with additional features. For a beginner though, very basic cable release will get the job done. -
Bubble Leveler
How many times have you come home with landscapes and architecture photos with crooked horizons or buildings? Even if you can fix these problems using an image processing software, when you crop, you may loose some important elements towards the edge of your frame.
You have a simple solution for this–get a bubble leveler. You can get a simple hot shoe mount bubble leveler for as low as $2. Get the camera perfectly leveled (horizontally and vertically), and then take your picture.
As an alternative, you can use bubble levers that come build into tripods. Also, some modern day cameras come with in-camera leveling features. Read your camera manual to find out if your camera has this feature. -
White Balance Card
One other problem that beginner photographers face usually is white balance. There are different white balance modes in your camera that help you to make adjustments based on available light sources (for example, tungsten, fluorescent, flash, etc.,). However, when you are in a mixed lighting condition such as a mix of sunlight and tungsten light, a mix of different color tungsten lights, or when you use your flash under a different ambient light condition, it is difficult to get the white balance correct using camera presets.
This is where the custom white balance feature come in handy. In order to do this, you need to have a white balance card (some people call it as a grey card). You can buy these cards from online retailers or from your local camera shop for very cheap. If not, you can make your own. In order to custom white balance, what you need is a non-reflective, neutral grey or white surface.
With a white balance card in handy, you can take a picture filling the frame with your white balance card and then use camera settings to set the custom white balance or use that picture as a reference in post processing to correct white balance for all other images created under the same lighting condition.
I took this photo inside a church with Auto White Balance (AWB) setting on my camera. Then, I used a picture of a white balance card, that I took under the same lighting condition, to correct white balance using Adobe Lightroom. ©2014 Chathura Jayasinghe Photography If you are not familiar with custom white balance settings, camera manual is your best friend. Since there are so many camera brands and models out there, it is difficult to give a short and general answer for how to set custom white balance in every camera.
Ansel Adams once said “You don’t take a photograph, you make it.” In this image making process, it is up to the photographer to decide what accessories to use and how to control light and camera gear to make the best picture possible.